Howdy Peeps! Today I get to unveil an amazing project that is soooo fun! Do you remember back when I was having the room dilemma about where to put my new baby? Creed is our fourth child, and we have five bedrooms; however, one of those bedrooms is our office (and main location for All Things Thrifty). The other kids are upstairs, which will be the future destination for the baby also, but I didn’t want to jump to that conclusion for a few years. There were so many pros and cons to this dilemma, but the ultimate decision was to put the baby in our guest bedroom.
To those that may not know, I live in St. George, UT. I LOVE it here for many reasons, and one of those reasons is that people LOVE to visit St. George. It is definitely a vacation spot. We have visitors a lot. I love that. When we were looking at houses, one of my necessities in a house was a guest bedroom. I am a firm believer that if you have comfortable place for visitors, they will feel more comfortable coming to stay. So, when we decided to put Creed in the guest room, the plan was to have the best of both worlds. We would decorate the nursery as planned AND have a guest room for the weekends we have visitors. How, you might ask?
With a WILDING WALL BED! (pronounced Wild—ing, like born to be WILD).
We got our DIY kit from the folks over at Wilding Wall Beds a few weeks ago, and I have been so excited to assemble this bad boy, I could hardly stand it. The kits come in all sorts of wood options, and after a few back and forth deliberations, we went with “Oak.” We wanted the wood to be nice and strong, and we wanted to grain of the wood to duplicate the rustic feel of Creed’s Nursery.
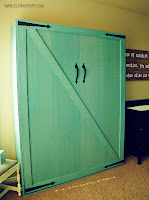
We will be showcasing the process of assembling this project in a few future posts, but I had to show you the end result! I was super excited to make this bed into a “Barn” door. The nursery already has barn wood and two old windows as decor pieces.
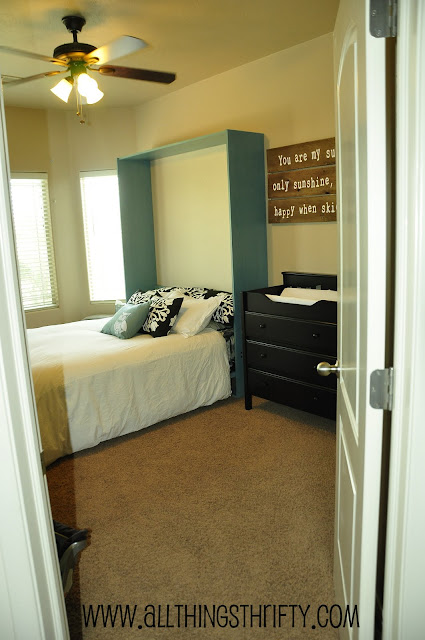
If you didn’t know this was a bed, you may think it was a free standing closet. It holds a queen sized bed perfectly. In fact, my Mother in Law and Father in Law already slept in the bed this weekend, and they loved it.
The Wilding Wall Beds come with amazing hardware kids that allow you to safely and surprisingly EASILY lower the bed.
The DIY kit came unfinished, which gives the versatility to personalize it to ANY space. I was super excited to add the “z” of a barn door to the front and add some barn wood hardware to finalize the rustic look I was going for.
So, for the normal every day life around here, the bed will be nice and snug in its place, the wall! And for the times where we have visitors, don’t worry, in point five seconds, the bed is available. VOILA!
If you have a design dilemma like we did, Wilding Wall Beds is a great way to solve it! The amazing staff impressed me from the start, and the DIY kit comes with amazing instruction videos to eliminate the complications of putting together the kit. The showroom is beautiful, too! I was amazed at all the different options they had.
My personal favorite? The BUNK BED WALL BEDS! Click on the image to check out how these bad boys open and close.
How cool is that!??!
Stay tuned for more details on how we finished the wood and the assembly process. 🙂 Do you love it? I LOVE IT!
Wilding Wall Beds provided a DIY kit to me as a sponsorship opportunity. All opinions are 100% mine, and I would never promote something that I didn’t believe was a fantastic product.


My goodness, what a wonderful compromise! The bed looks so comfy!
I have always thought murphy beds were cool. If we had a teeny house I'd buy one for our everyday bed without a second thought!
AWESOME!! I have my mattresses bungie chorded to the wall at this point. I can't wait for more information.
I love Murphy beds… Yours came out great! I loved the video of the bunk beds too. I didn't know they made those! Thanks!
~Rainey~ @ The Project table
This is awesome!!
This is incredible!!!! GREAT JOB!!!!!!!!!!!!
http://www.iheartmygluegun.com
Wow! That's awesome! What a great use of the space. And the way you customized it to look like a barn door is just amazing. Love it, love it, love it!
I love it!!! How perfect! I love the color you chose and the rustic look! Wish I had one when my kids were young. Wanda
I saw an ad for these beds when I was in Santa Clara UT and I am totally planning on doing this in our basement when we finish it. I believe in having a place for visitors, too! I'll watch to see how you installed the kit as this is the option we will probably go with.
Sweeet! If I ever have an extra room, I am so getting one of those.
Amazing! What a fantastic idea. I'm so going to do this someday!!!
Oh my heck brooke! I love love love love love it! You are so talented and I feel so lucky to have you as a SIL thanks for always helping me and answering my questions. Love you!
OMG- Love it and the barnstyle door. Where did you get the hardware from. I'm always looking for stuff like that!
sunshinequeen.wordpress.com
I LOVE THIS!!! We stayed in a condo recently that had one of these in the family room. My family is building a cabin and this would be perfect to go in our room so during the day we can have the space and at night a comfy bed. I am so excited!!!
I loved your blog, I'm going.
I'm from Brazil.
Visit my blog:
http://areformaenos.blogspot.com/
http://minhasartesemanhas.blogspot.com/
Hugs, Carla.
I LOVE LOVE LOVE IT! This is so dang cute. I am in love with the color choice. Would yo be able to let me know the color and brand?
Wow I totally love that video too!! I'm am thinking that a bed of theirs will make it in my craft room/new guest room when my kids get old enough to go down to the basement room. Totally in LOVE!!
Wow Brooke I LOVE that!
I DO love it! SO much! I kind of want one, even though I have no place for it! You are so creative, I am amazed! The metal accents are truely inspired! your baby is only lucky little boy!
-Heather from lifeofapasseri.blogspot.com
Wow…I have no words. I so want that for my tiny craft/guest room! It would make crafting/sewing I million times easier!
That is SO cute!!! And such a good idea! I absolutely adore your blog and have reading it for a long time when I realized that I know you! Well, you were my professor at SUU and I am friends with your brother and his wife! Anyway, you are fabulous and I LOVE everything you do!
http://www.sixsistersstuff.blogspot.com
that is exactly what we have been looking for!! Between us this is baby no 7 ( we have 3 each) and hubbys kids are here every 2 weeks, would be perfect for them! Thanks for sharing 🙂
That is so cool! I can't believe you have 4 kids and still find time to write this wonderful blog!
Lindsey Turner
http://thriftandshout.blogspot.com
So cool! What great design!
🙂
I love it, but I went to the site and those things are way beyond what I can afford!! Sure wish I could do this in my den…maybe one day. Love the paint color you used!!
So stinkin fun! I'm jealous.
xo Jana
I bought the frame and we installed it pretty much w/o a problem. The only thing we can't figure out is how they put the door on the bottom of the frame because the legs have to come down. If you have any information please post it.
Wondering if there is a tutorial on this project that I missed? Would love to see pictures of step by step process, ordering mine soon!!
Is their a step by step tutorial on this? Would love to see a video of it in action also!
Head over to the manufacture’s website and you will find what you are looking for:http://www.wallbedsbywilding.com
Hi there, still trying to figure out where the legs come down? I don’t see anyting on the wallbedsbywilding site mentioning how you made the legs? Thanks!