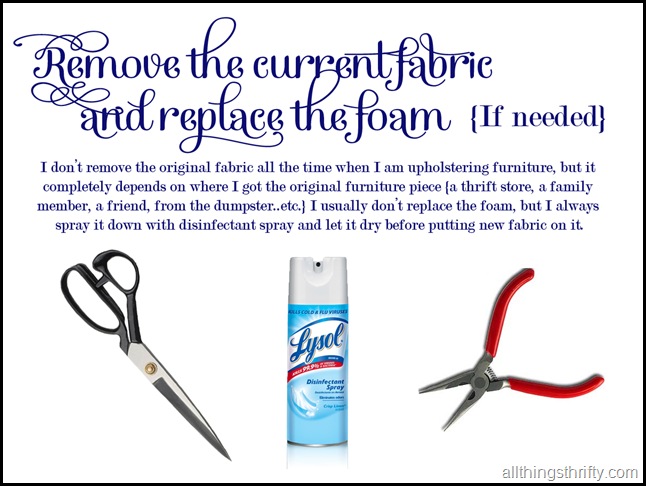
One of the most common questions I get is, “How do I upholster a bench?” I always practically SCREAM, “IT IS SOOOO EASY!!” I have helped dozens of people with this task. So, today I want to share the simple and easy instructions on how to do this yourself! You can even take these instructions and apply them to upholstering other items also. The same instructions work on upholstering dining room chairs too! 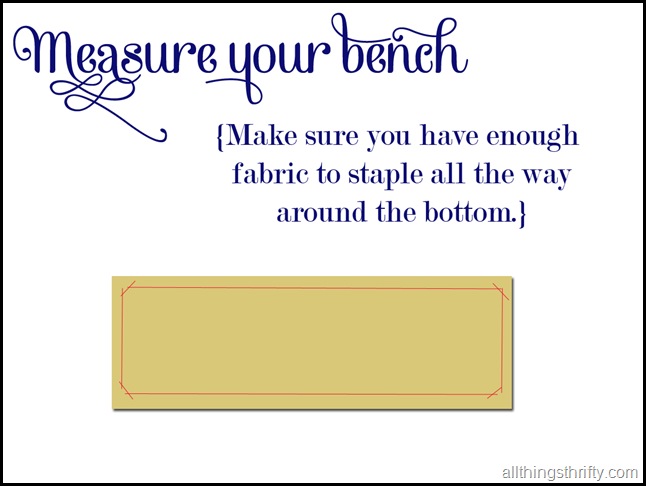 Before moving on to the next step, observe where the original fabric is stapled. You need to make sure you have enough fabric! Then, you will need to decide if you would like to remove the original fabric. I make this decision on a case by case basis depending on where the furniture came from and if it is in good shape or not. Don’t be shy, just start shredding it with your scissors and remove the staples with pliers.
  Make sure you have enough fabric to pull tight. Plus, make sure you use a fabric that is heavier than cotton. I use at least a canvas fabric when I upholster furniture. I have used cotton before and it is not strong enough when you pull hard. {Yes, I am speaking from experience when I say that your fabric can rip if you use cotton.}
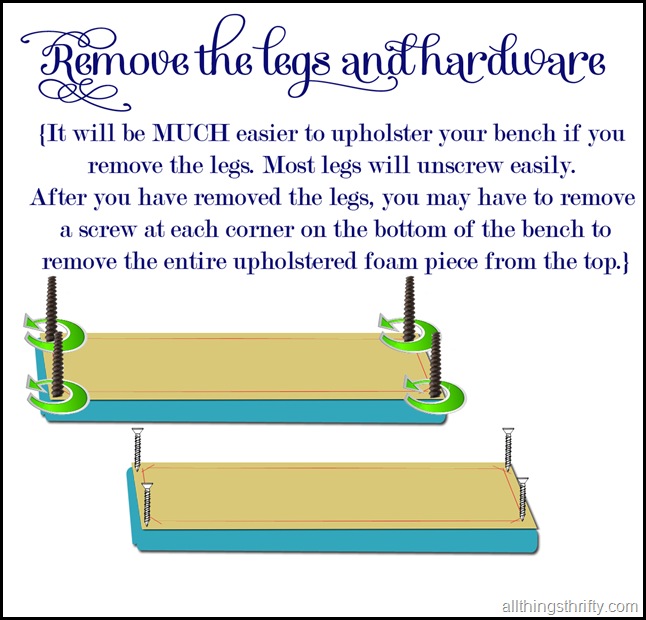
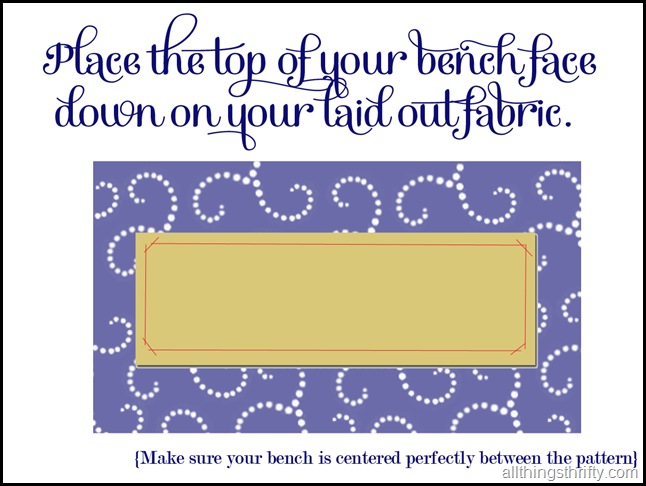
Once you have removed the legs and chosen a heavy enough fabric, lay out your fabric on a clean surface. DON’T try and upholster your bench out in your garage…YES, I am THAT dumb…I’ve done it before. I now prefer to upholster inside, but you can’t have little ones around since there will be sharp objects, tools, and random staples all around you by the time you get finished.  Make sure that your fabric pattern is EXACTLY centered. Remember that the goal is to make it look like you BOUGHT the bench. 🙂
 The nex step is my favorite. Maybe it is because my husband teases me about this stuff ALL THE TIME. I’m a dufus. I start projects all the time without checking if I have the right hardware or tools handy. PLUS, I never put stuff away when I get finished with a project. SOOOO, I’m constantly looking for the hammer. I’m awesome like that. {Thumbs down}.
  I usually use my electric staple gun. But, if the fabric I chose is super heavy duty, the air compressor is a much better option. Sometimes I get started with my electric staple gun and realize that the wood is made of STEEL {not literally, but it is too hard for the electric stapler to penetrate the surface}. So, I end up switching to the compressor in that case.
I have tried to explain this process without images and it is super hard, so I decided to draw up an illustration for you to see. I have this down to a science, so I have made a LOT of mistakes along the way. If you take my advice, and do it meticulously, I promise your bench will look amazing. No cutting corners peeps. You want your upholstery job to look profesh, NOT homemade. 🙂 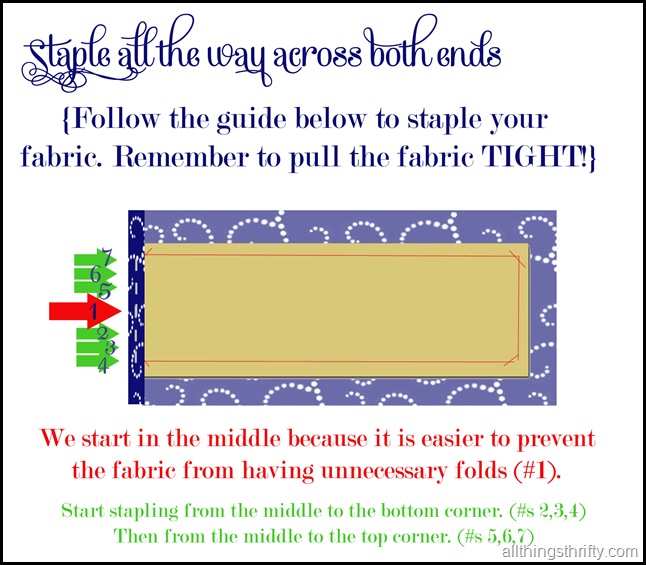
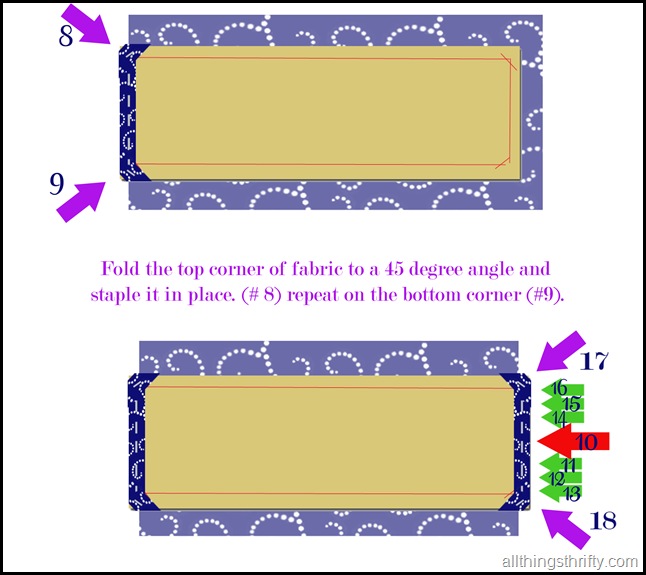
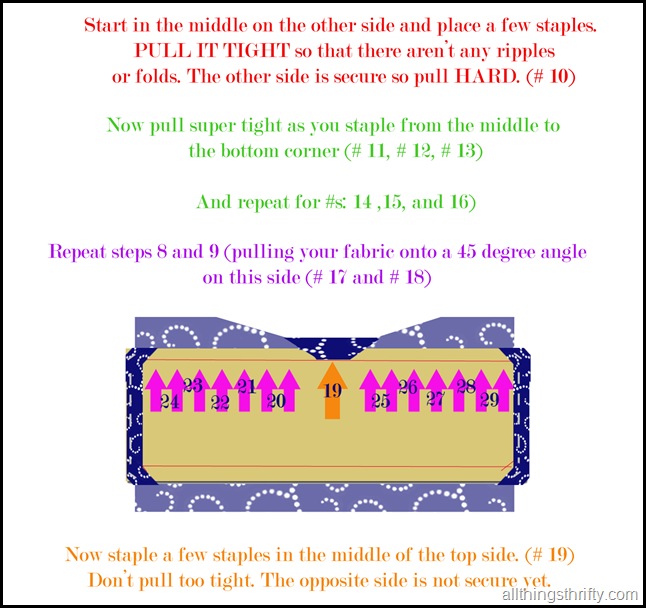
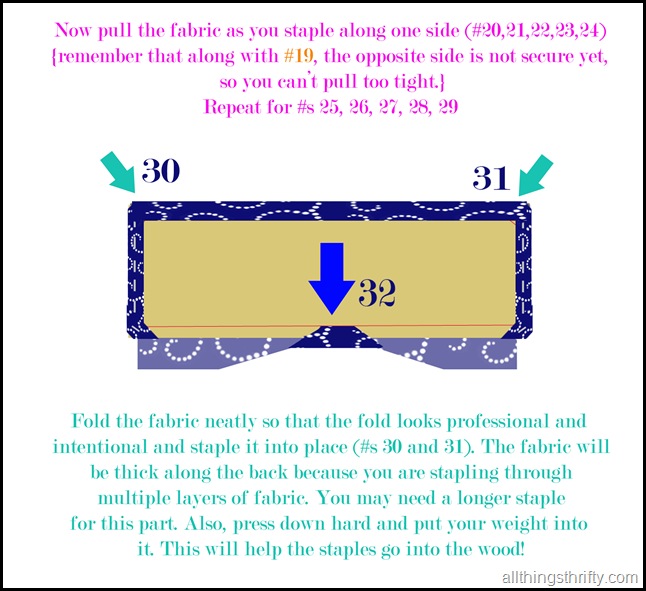
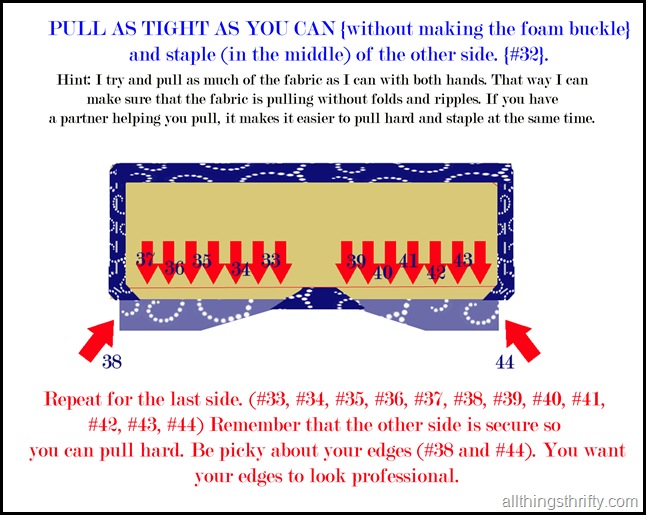
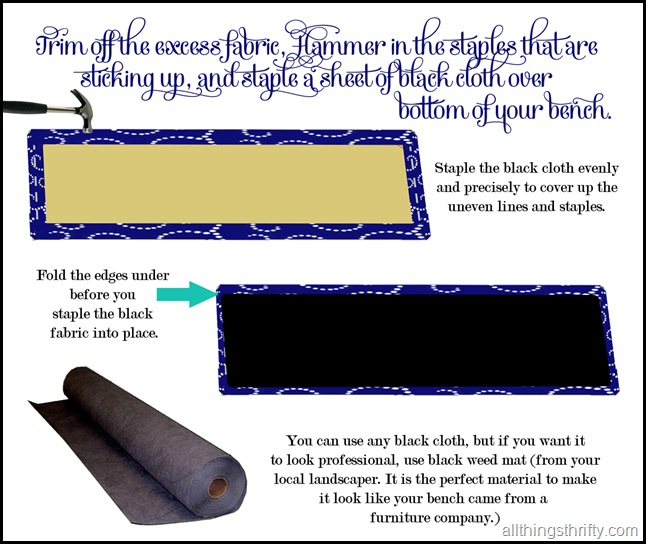 You will need to cut small slits into the black fabric so that you can replace your bench legs.
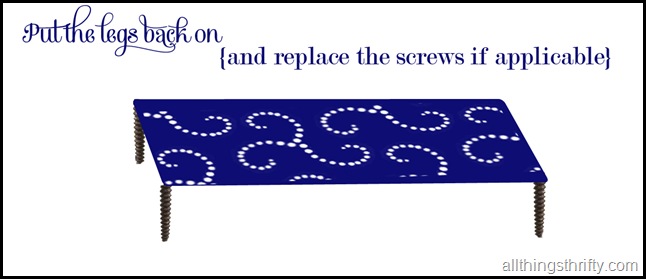
VOILA!!!!
P.S. I kind of need attention after pressing “publish” today since my computer was giving me fits all morning {restarting itself and crap}, and my 1 year old is sitting on my lap as I finish this post. So, do a girl a favor and comment. Ha ha. I might need to hear a little ?love and affection from my amazing readers?. How’s that for begging!?!?
xoxo,
Have a great weekend.
Linking up to Desi’s DIY Linky Party at the 36th Avenue.
DIY: How to upholster a bench.
Published on May 4, 2012


I am just getting ready to cover my piano bench! Perfect timing, and I love the info about the weed fabric. Genius!
The midsection of the post went fuzzy on me, but because of the amazing tutorial with pictures (my favorite kind of reading), it made perfect sense! You broke that down so easily….thank you!!
Lysol = good call and landscaping black mat =genius. 🙂
Have a great weekend and I look forward to more posts.
the whole center section is blurry? everything else is clear..so sad I wanted to read the directions.
I am going to bookmark this. I am still searching for the perfect one. Thanks for making this look like we all can do this.
This is awesome!! Now I just need to find a bench to recover!
Thanks for the post!
Thanks for the weed mat tip! I always wondered where you'd get that fabric.
Great diagrams you did! Great explanation! Thanks for sharing and inspiring!
Hi, Brook
Great tutorial! Thanks for sharing.
Vanessa
Just bought a bench today, perfect timing. I had recovered a couple of stools and had a hard time with the corners, I am going to use your guide to recover the stool. thanks so much
Ok, this post was meant for me!!! I am currently re-covering an awesome chair that I found at a garage sale for my daughters room. This is exactly the info that I needed! Thank you!!! I am also thinking of glazing the chair too. I spray painted it peekaboo blue and think the black glaze will look cool but I'm a little nervous. I'll send you pics when it's done. I love your blog so much. Keep up the good work! You are awesome! Oh, and I'm Brieann, Pam Dana's niece! I met you last summer 🙂
Hello 1 year old! I have a few helpers in my home also. Thank you for helping mommy publish a very helpful post. Now go and get some lovin'!
Thank you thank you thank you!
I've been thinking for a while that I could do this – now I know I can. Lovely clear tutorial.
Thank you thank you thank you!
I've been thinking for a while that I could do this – now I know I can. Lovely clear tutorial.
I'm trying the fix the fuzziness! Of course it couldn't just post the way it should! 🙂
Fuzziness is FIXED!!! 🙂
i honestly just finished upholstering my new bench right before i came inside to relax and see how to upholster a bench on your blog!!!
You're amazing Brooke! Love the tutorial! I recently did this but added some tufting! I love your step by step! You're the bomb!
xoxo, Mallory @ Classy Clutter
I cannot believe how detailed & perfect this tutorial is. Best all around that I've WVER seen. For reals.
Now I need to find an excuse to get a bench (or something like it) so I can do this!
Thanks, Brooke!
Always willing to help a girl out with a 1 yr. old on her lap!
~Bliss~
I've done this several times in the past, (by the seat of my pants) method. lol
you gave amazing tips, some of which never occurred to me.
thanks for giving me new insight to these projects for a more professional look. love all you do for me.
My lap is free for once so I am actually able to leave you a comment 🙂 I check your website nearly everyday-I'm so glad you have it, otherwise I'd be calling you on every project I do!
I love your guts!
I love the way you've formatted your excellent tutorial. I'm just getting ready to write my first one & yours is a great inspiration.
You have clear & concise directions, excellently portrayed diagrams, & lots of extra tips to help us avoid trouble.
Thanks for posting.
dawnedesign.net
This is really useful and I will be referring back to it often. The weed mat tip is brilliant!
Great tutorial! I'm so glad you've done all the hard work of figuring it out for us newbies!!
I am getting ready to cover my piano bench. The weed cloth is a great idea!!!!!
i love the step by step.. i can't wait until all the garage sales start this summer so i can find things to re-do
http://www.studentswife.com
I've been wanting a bench at the end of my bed for YEARS! I've had the fabric for about one year. Would you believe I just made my first roadside rescue YESTERDAY! A friend spotted it on her nightly walk, and called me immediately. It's a big, long, PERFECT bench, and then your post today???? Seriously… meant to be! THANKS! Can't wait to get started.
Great blog and I really love the bench!
flairbybrandi.blogspot.com
One word Awesome!!!!!!!!!!
Thank you for posting such detailed instructions. I have always wanted to try to this and now have the perfect instructions to take a leap! Thanks!!!!
Thanks for the detailed instructions! I am now not afraid to try this…ox mary ann
WHich side do you start on for the seat of a chair that is a trapezoid shape?
@Jen:
Just pick any side and work your way around. Good luck!
Found a beautiful 1940’s vanity with bench. I've never reupholstered before, so your tutorial is perfect for me! I would have never thought od weed material for the underneath side. So many good tips. Thanks so much.!
is there an easy way to do buttons on a bench? What is a good material for a kids room? Thanks! Great tutorial!!
Thank you for your easy to follow instructions. I am just preparing to cover the lid of my hope chest.
I’ve been ‘collecting’ books, tools, websites, and saving rather than getting rid of, old furniture for reupholstering. I needed to reupholster my 1980’s era mauve piano bench after grandchildren moved in with me and left their ‘mark’ on the silk fabric. I had a remant of fabric i bought to make protective sleeves for my table leaves that was the right color for the lpiano room but surfed the web hoping to find info on new foam for padding. that’s when the DIY gods led me to your website! Your web site is one of the best I’ve seen and will give me courage to do the chairs, sofa and loveseat stored in he basement! You ladies are fun, amazing, and talented. Thanks for all your great ideas. This grandma is loving it! You can teach an old dog new tricks! Thanks to you, my piano bench turned out great!
I can only find manual 1/4 inch staple guns. Do you think that would be powerful enough for this sort of project?
Yes that should work as long as your fabric isn’t too thick. On the corners where the fabric folds you need a longer staple but if your fabric isn’t too thick you should be fine.
I LOVE THIS I’M GOING TO TRY THIS…… I never done it . Do you have any beginner tips please
Thanks for the easy tips! Just finished a window seat and have the fabric to start the cover!
Hi, I am a blogger as well so I appreciate you expect some sort of feedback, particularly good ones. I really like your post. Just trying to see how I can do mine as I intend to upholster a book case from ikea that i will use as bench. please do visit my website when you get a chance.
I’ve had my fabric for about a year and after reading your simple basic instructions, I think I can do it. It will be done before nighttime. Thanks for your easy instructions.
Yay! I’m so excited to try this. I have an oval bench in my bathroom… not having corners should make folding the fabric interesting. I’ll take a pic of how the original fabric is done, and try to emulate that. But I feel like I can do it after reading your post. Thank you!
You CAN do it! Good luck!
Thanks for the great tuitorial on how to cover the bench. I’ve been looking for a sturdy bench or coffee table that I could repaint, make a pad/cover for my husband to sit on to put on his clothes and shoes. He sits on the edge of the bed to do this and is not good with balance due to spinal stenois surgery, plus his spine is riddled with arthritis.. I am so afraid he will slip off the bed and fall and break a hip or arm or hit his head on a piece of furniture. I’m thinking a piano bench may not be sturdy enough but a maple or oak coffee table might be sturdier. I could buy a piece of foam from Joanne’s to cover with material of my choice. Even an old cedar chest would be sturdy and a perfect height. Regardless what I find to convert to a bench for him, your tuitorial has given me confidence and inspiration that I can do this myself!
Great tutorial, I enjoy doing my own projects! it is relaxing for the mind ! and the finished product is rewarding! I am just beginning to DIY, and this site has been very helpful, thanks a lot and keep posting!
hi, this has given me the boost to do a job that’s been waiting several years! it’s the second set of tips i’ve read, and is simpler. i am going to adapt though as don’t have a good enough stapler – am hoping tiny sharp tacks will also work!
maya
Thanks for this post! I followed your instructinos and was able to reupholster my first ever bench. Turned a hideous piece of furniture into one of my favorites!
THANK YOU for the amazing step-by-step instructions!!!! You are awesome and talented, and I am so happy that you have taken the time to do this for others’ benefit; it is much appreciated. I am re-upholstering an ottoman AND chairs AND 4 kitchen stools that are all done in horrible fake leather, and now have rips and tears and are peeling. Our furniture looks absolutely horrid, but we have two small-ish kids who jump on them (yes, I tell them not to!) and the poor furniture has to take a lot of wear and tear. We don’t have money to replace them and frankly, furniture that we can afford right now would not be good quality and would be worse that what we’ve got. At least what we have is solid in construction, so spending a little on fabric (I am using outdoor waterproof fabric so when my kids spill juice, etc. on it it won’t stain much!) is going to give everything a big facelift and make our house acceptable again. Seriously, I am embarassed whenever I have anyone over, it’s so bad! I can’t wait to try this and see my “new” look! Thanks again. 🙂
I am so excited for you! It’s going to be a great way to make your house feel refreshed without breaking the bank! xoxo
I’m trying this today but my bench is a storage bench. Any suggestions or links that can help recover the base? Thanks! I’m super excited (since I am not crafty or handy.)
Karen, send me a picture to allthingsthriftyassistant at gmail dot com and I will do my best to help you. 🙂
I just moved into a house and started reading about reupholstering thrifted and garage sale furniture. Your site is a wealth of information, and this simple bench tutorial is a good place for me to start. Step 1: buy a staple gun.
This is a GREAT tutorial… and it will be righty next to me as I try my first re-upholstery project – INSIDE, tools ready, staples loaded… THANK YOU for the fabulous illustrations!
Thank you so much for this! Couldn’t find any instructions that didn’t require taking the whole damn thing apart!
Fantastic!! Thank you!
I just “rescued” a short bench (22″) at a garage sale last week and decided I could learn how to upholster it. Well, voila! A simple search turned up your article and you make it all seem very do-able. Thanks for posting six years ago what appears to be timeless!
Thank you! Good luck on your project!