I have seen some SAWEEEEEET lamps out there right now with spheres on the lamp bases.
I wanted to try and make my own version, but it has taken me a few weeks to come up with a worthy alternative for the lamp base. If I used styrofoam, it wouldn’t look smooth. If I used circles of wood, it would cost too much.
So, I let it mull around my brain for awhile, and then it dawned on me! What if I used CHRISTMAS ORNAMENTS!?!? I have a ba-dillion of the plastic Christmas ornaments in my garage!
When I was explaining my idea to Awesomeness (my husband) he was NOT catching my vision. Does this ever happen to you? Some people are blessed with the ability to visualize the finishing product of a project. I’m lucky to be one of those people. Awesomeness, is not one of those people. So, after the projects are done, he usually really likes what I’ve done. But, to get him on the same page as me, takes some persuasion at times.
I tend to think up some CRAZY ideas at times, so he may think I’m off my rocker for good reason! 🙂
But, this particular project was sooo much fun once I convinced him to be on my side. Sidenote: I wish I had the ability to know which power tools to use because then I wouldn’t have to use my persuasion skills so much. 😉
So, I started by acquiring a tall lamp at the local D.I. (Utah’s version of Goodwill). The lamp cost $8.00. I wanted it to be tall because I wanted to take it with me to Good Things Utah and a tall lamp fit in with my plan.
Here are the before pictures:
We took the lamp apart to allow the Christmas ornaments to slide over the lamp pole. We actually had to cut the lamp electric cord to do this. Luckily the hubsters knows how to fix it.
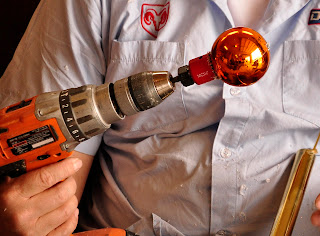
Next, I chose which size of ornaments I wanted to use and cut holes in them with a WHOLE saw…on the Good Things Utah segment, I said “BAND” saw….I really don’t know what I’m talking about when it comes to power tools! I need lessons. Maybe Awesomeness will teach me if I ask him nicely with a batch of his favorite cookies.
Anywho…next we stacked the ornaments onto the lamp pole alternating between the big ornaments and the small ornaments. We measured before hand to make sure that we had enough ornaments to fit the pole perfectly.
Originally I thought I would need to hot glue the ornaments into place, but they fit so perfectly and snuggly that gluing them was not needed.
After it got done, I LOVED the result. In fact, the orange was awesome! But, remember, I’m a FREAK about orange. I love it. But, I still primed it (with KILZ) and painted it (with Krylon purple) to achieve my original plan.
All we had to do at this point was reattach the lamp parts and splice the electrical wire back together.
It went perfect in my girls’ room.
I must admit, I kind of wanted it for MY room! 🙂
But, once I promised it to them for their room, it was a done deal. No way were they willing to give it up!
I love the end result. So spunky and CUTE!!! And the best part!?!? The total cost: Less than $15.00!!! I love coming up with thrifty alternatives for what I see out there. It’s my favorite!
Think of all the COLORS!! It would even be GREAT white!
Linking to:

Linked up at Melissa at The Inspired Room‘s Paint Party!


GENIUS! I love this!
I LOVE THIS. I was sitting there thinking, wait I've seen this before. Then I saw the color on your lamp and I was like Wait I have seen this color on the lamp before. Then it hits me….hee hee. It was your Studio 5 segment. So so cute.
This is so freaking cool! I have to try this one out!!!
My mouth is wide open ooohing and aaahhhiing over that lamp!!! that is freakin FABULOUS!
This turned out great!!!!!!
I'm curious how sturdy it is? Christmas ornaments tend to be fragile…do you worry about them shattering?
It looks freakin' awesome though!
I LOVE it! I'm sure you've blogged about it and I must have missed it, but I also LOVE the letters spelling out Londyn 🙂
love it!!! curious. I have seen glass ball ornaments but not plastic. where did you get them?
Dollar Tree
Oh my gosh! That is so freaking great. I don't have the words. I'm not as blessed as with such a vision.
Great Lamp! I see how everyone would want it, including me!
This is genius! (Did I spell that right?) Anyway, thank you so much for sharing this idea! I have so many places for great lamps like this one. It would look great on a table lamp too. 🙂 And I have a tall floor lamp in my living room just waiting for it. Now if I could only convince my husband to do the electrical work I'd be set!
Oh my gosh. I must have one. Thanks for providing a thorough tutorial, because that just made its way to the top of my to do list!
bugaboo, mini, mr & me
AMAZING!! I have a tall lamp and I think I could dig out my Christmas box and find a bunch of plastic ornaments!! WOO HOO- I may have to try this out!!
Um…LOVE IT! I am going to have to start looking for some plastic ornaments and try this out for myself!
Vanessa @Cooper Avenue
That is truly creative! I totally love it!
You are fantastic. I so, so love this. It's just beyond wonderful. Pottery Barn will be selling this same design soon for $300, I'm sure.
How awesome are you?! That turned out so great!!! I love love love it. The purple is perfect.
to the person who asked about plastic ornaments come to australia. Nearly all christmas baubles are plastic here!
I love this. This is so stinkin' amazing! Wow. I just can't believe you dreamed this up. Very cool and I love your blog. 🙂
oh my gosh, that is flippin' awesome! who would know about the ornaments. seriously amazing! love your daughter's name, too, how did i not know that?
The pictures don't quite do it justice, do they? It really is such a sawweeett lamp and an amazing idea! Lucky little girls of yours!!! xoxo
wow…this is awesome!
That is awesome! I never would have thought to do that. You creative genius, you!
Awesomeness! You are a genius! And if you want I'll tell your kids that :).
Brooke – you never cease to amaze me…this is amazing!!!!
This is seriously AWESOME! Great Job, and I wish I had your brain 🙂 I posted your project on my blog today too! 🙂
What a brilliant idea! Love it.
That is genius! So cute.
I love it! So creative.
O.M.G. that is awesome. jaw dropping. amazing. innovative. wonderful. I love it!
super cute and fun idea!!!!! I love the color!!!
This comment has been removed by the author.
Love the final project, it's amazing….as usual! I awarded you the Kreative Blogger award on my blog. http://thrifty101.blogspot.com/2011/05/kreativ-blogger-award.html
~Michelle @ http://www.thrifty101.blogspot.com
I LOOOOVE this!!!! Thanks to you I have just added yet another beautimous thing to my list of "must make/haves"!!!(not to mention another item to my ever growing scavenger list for all the thrift stores I frequent~like I NEED an excuse to go shopping~lol)
OMG that is soooo cool. Please don't ever stop being awesome!
I'm going to blog about this project on my blog. People need to see this!!!!!!
Ingenious! What a great idea. Definitely went to my pinterest board and filed away for future use. I love it!
I am in love with this lamp, and will be on the lookout for a usuable lamp at GW. You are a very talented lady, thanks for sharing, Sue
Seriously awesome project!!!!
I bet you walked by your girls room about a hundred times the first day you had it in their room just so you could look at it. Don't you love those kinds of projects. This one has me on pins and needsles waiting to see what you come up with next! SUPERB!!!!!
This is definately on my to-do list. Right now I've got a list with 6 or 7 things ahead of it though!! 🙂
OMMMYY gosh I love it!!! You are totally creative! Found your blog via someone else's blogroll and I love it!! I am your newest follower 🙂
-Lindsay
Delighted Momma
OH MY GOSH!!!! I'm speechless.
Pure delicious awesomeness. You rock!
This comment has been removed by the author.
I. Love. This. Thanks for sharing!!
SUPER duper cool! I linked on the Decor Hacks Facebook page. How fun!!
K, my hubby wants to know how your hubby made sure the hole he cut was straight up and down…Is there an easy way? Also, if you love Orange, you should see the place we're renting… Orange countertops/backsplash as soon as you walk in the front door. Green shag carpet, and rose pink bath & toilet complete the look! I'm pretty much speechless whenever I walk in the door!
Great use of ornaments to get the bubble lamp look! Love how you used two different sizes too!
-caroline @ c.w.frosting
this is extremely cool and love the color.
http://shaejus.blogspot.com/
Wow, wow! OMG, that's awesome!
That is so pretty! I need to do this to some of my floor lamps! So excited!
Love the lamp, my daughters' room will have one soon. Did you make the letters on the wall? I would really like to make some for my girls room,.
Very awesome idea! Love it!
Awesome idea! Love it!
wow.
Goodness! Just saw this via Pinterest and I LOVE IT!!! What a super great idea! And it looks so pretty. I am totally pinning this for my UGLY lamp's transformation (eventually)!
Love it!
How did you line up the hole cuts on both sides of the ornaments so the pole is centered? Is that clear? You know, so you don't have 2/3 of the ornament sticking out on one side of the hole, and 1/3 on the other.
@HeidiJJJJ:
We just did the best we could. I wish I had a magic answer but I don't… Good eyes and hands! Ha!
Good Luck!
Adorable!! I would want it for my room too! Dontcha hate when you promise it to a child, then envy it for your room! HA! Thanks for sharing and enjoy your blog! Hugs
Have you had any problems with how fragile the glass balls are? I would be worried they would break? I love it and think I might try it, but thought I'd double check!
Thanks,
Audra
She used plastic, not glass.
Thank you for this post. I made this last week and used the plastic balls, but mine were clear so I painted the inside. I bought a lamp shade and covered it in fabric. So stinking cute! Thank you again.
You have the absolute best blog out there hands down. I’ve searched blogs and read and read….Dear you have a gift. Keep up the awesome work and maybe one day I can meet you. Blessings.