 I know a lot of you may already know I am obsessed with furniture. Some people love shoes or clothes, I love furniture (and fabric, but that is beside the point!). I have a love affair with furniture especially. I consider myself a treasure hunter and I love to search for THE PERFECT furniture pieces for my home. I have refinished a lot of furniture, and even reupholstered a few furniture pieces. Choosing the right furniture, or customizing it to your space is ESSENTIAL in having a home that feels like YOURS. So, I’d like to announce a brand new series that will take place EVERY FRIDAY here at All Things Thrifty. Here’s the gist: EVERY FRIDAY you will get to see some FREAKIN’ FABULOUS FURNITURE where you will find furniture that I refinish myself, along with the occasional feature of someone else’s furniture. (so yes, I could feature YOU if you have something to submit). I am excited to showcase some amazing stuff out there, and I might even showcase some of the furniture on my “retail wish list.” Over the last three years of interior decorating, I have realized: The furniture that you have in your home defines your style and definitely helps to BRIGHTEN and LIVEN it. I love furniture, and I cannot wait to show you my FIRST FREAKIN’ FABULOUS FURNITURE post!
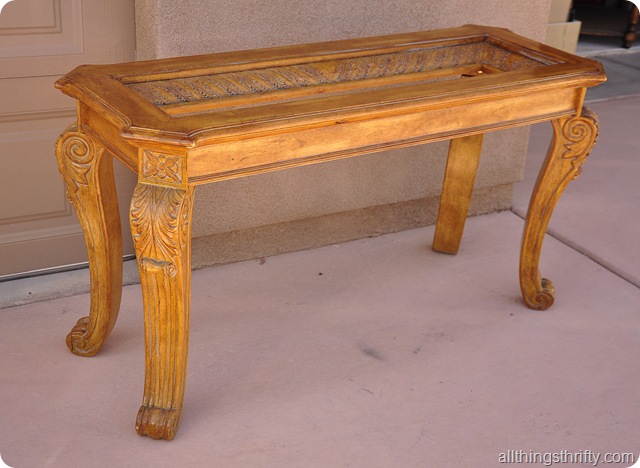
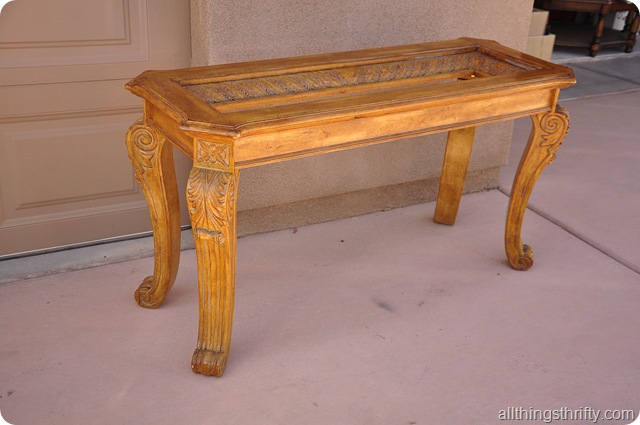
My friends Dani and Ashton asked me to refinish their intricate entry way sofa table. They had inherited the furniture from a relative, and they were chunky, intricate, and AWESOME (the furniture, not the relative, he, he)! Not only did they recieve this amazing sofa table, but they also got the matching coffee table and side tables too! Lucky freakin’ ducks. I loved the intricate carvings, and for some, the tables might have been perfect without refinishing them. However, for Dani and Ashton’s home, leaving them this wood color would have been a BIG mistake.
 Just check out the intricate details of these bad boys. If you have been around All Things Thrifty for awhile, you already know that furniture like this is EXACTLY my specialty. I love to glaze furniture and when you add glaze to refinish furniture like these it makes those nooks and crannies just POP! I knew the work that was ahead of me, and I got to work.


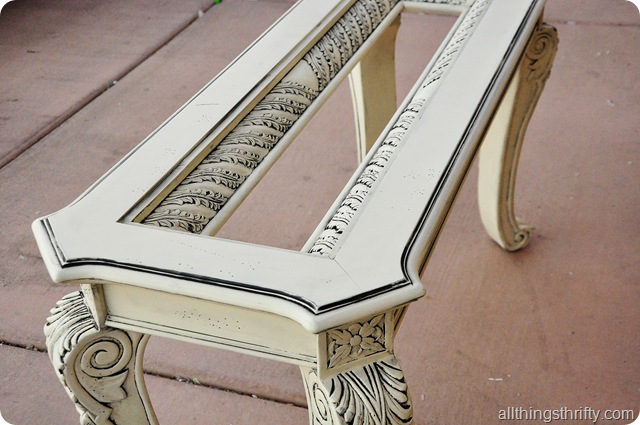
 As you can see, the furniture turned out GREAT! I wish I had this in MY HOUSE!!
 Just take a gander at all those beautiful intricate details!


Want another look at the before picture?
 And the After photo…just to remind you of how stinkin’ SAWEEEET it turned out!?!? NO PROBLEM!
I’m telling ya, I love before and after photos. I’m a little OBSESSED! As a part of my FREAKIN’ FABULOUS FURNITURE series, I am accepting submissions for features. I will be featuring my own transformations as well as an occasional feature of others. So, if you have a FREAKIN’ FABULOUS piece of FURNITURE, send me a GOOD photo to allthingsthrifty at gmail dot com.

Freakin Fantastic is right! I need something exactly like this for my upstairs hallway.
Freakin Fantastic is right! I need something exactly like this for my upstairs hallway.
That is freaking fabulous!! I love the way it turned out! I notice you seem to always use spray paint…I was wondering if you have ever tried the Annie Sloan Chalk Paint??
What a gorgeous transformation — definitely the perfect choice of colours. This table would suit any decorating scheme.
Can't wait to see the other tables when you're done with them! 😉
dawnedesign.net
This comment has been removed by the author.
What a beautiful piece. I have a desk I'd like to refinish in that exact same technique. Thanks for the inspiration!
I just did this very same thing to my dining table (and finished just in time for Christmas company!) I am a little sad because the table top is already chipping even though I'm pretty sure I followed all your steps to the T too. I've been meaning to send you pics! The legs and "skirt" under the table top look just like your sofa table piece – AMAZING! I'm so glad I learned about glazing from you!
amazing, and the glaze is the magical touch
xoxo
rasha
I plan to paint lots more furniture this year. It is so amazing what a coat of paint will do for a tired piece of furniture!
I would love to have that freaking fabulous table. 🙂
I promise I did all that to my table, exactly how you said. The parts that chipped, (which are very small) went all the way to the wood! At least the layers are sticking together. Maybe I should use polyurethane instead; I've had better results with it.
Love your work!
Meg, when you do a dining room table that has a lot of traffic you definitely need to seal it with a polyacrylic clear coat to protect it. I would do at least 3-5 coats letting it dry completely in between. Brush it on with a NICE brush (not a cheap one). Also sand with 220 grit sand paper in between the coats. (Just read the directions on the container and follow it). I would hurry and do it before it chips more.
I guess I was assuming that you didn't seal it…ha ha. Have you put a seal over the top?
Meg,
CRAPPITY CRAP. That happens every so often! Basically that means that there were certain spots that the paint didn't want to adhere to. Did you sand the furniture before you primed it by any chance? Sometimes a light sand will help with that, but I rarely do that. Do you want to give it a try again? You would have to sand it down though. E-mail me a picture so I can see, and we'll continue the conversation back and forth via e-mail. 🙂
great job! I have redone all of my cherry furniture in my house and while it was a "real" job I love the way it looks.
Happy New Year and keep on sanding…
I love YOUR BLOG!
PLEAE COME VISIT MINE!
TELL ALL YOUR FRIENDS
Become and Member of our Blog and Save 10% at Restoration Hardware until the 1/25/2012 (even enjoy Free Shipping)
LOVE HAPPY HOME
http://happyhomewithjessicaturner.blogspot.com
Ok, I've done it! Spent today starting a blog of my own. You've inspired me! Thanks!
Hi Brooke,
My sister-in-law just introduced me to your blog and I am HOOKED!! I'm wanting to paint my kitchen table/chairs and am wondering what color you used on this table. I love love love it! Thank you for such great inspiration:)
Oooh la la!
You inspire us!
You are featured on a new
Mommy's Blog…
http://31main.blogspot.com/
Thanks for sharing and inspiring us!
31 Main Gals
Mandy,
I used Krylon Ivory Spray paint. I used the "gloss" sheen so that it would glaze easily! Thank you for your cute compliments! xoxo.
Would love that table! You did a great job refinishing it! Wish I had the guts to paint my furniture…
I love the job you did on this table, my hubby had a problem with me painting the wood furniture in our house but he is coming around lol
I have used spray paint on small projects but not on large piece of furniture, how do you deal with drips running down? Everyone tells me you have to use a paint sprayer to do a good job, but your projects look amazing.
check out my blog I am new to this and so its my blog but I am enjoying the projects and the blogging, would be nice to have an audience lol tobeystrashortreasure.blogspot.com
love your blog and your projects
take care Tobey
Hi ,
I have a dining room table that I want to redo and I love the antique /shabby chic/ look. I love doing distressed whites creams etc. any ideas of what I could do. It is solid oak. It has a lot of intricate details like this table. Also did you just glaze over the primer for this.there was no mention of a paint color?
Thanks many blessings for you and your amazing work!!!!!
Laura
Hi Laura, Thank you for your comment. What about a table like this one? Dining Room Table Also the color used on this sofa table is Krylon in Ivory. It's actually the same color I used on this table. Good luck!
You are a Freakin’ Genius!!
This is beautiful. I would like something just as intricate, but I would like to keep the wood showing, so I would prefer to stain it. How do I remove paint from intricate details, and how do I stain those areas? Please help me with your expert advice! I have seen a piece I like, but it has been painted several times. I am afraid to buy it be cause I don’t know if I will be able to remove all of the paint.
Removing the paint would not be an easy task, but it’s definitely possible. You would need to use a paint stripping agent and a toothbrush to get into all of the cracks. It also depends what paint was used on the piece first. If it was spray paint, then acetone can help get the paint off.
Beautiful, how does this glaze work with chalk paint
Since Chalk Paint is flat, glaze isn’t the best option to achieve this look. In order to wipe off glaze, you need some sheen on the paint. If you want to achieve this look with chalk paint, then I would suggest a dark wax/clear wax combination.