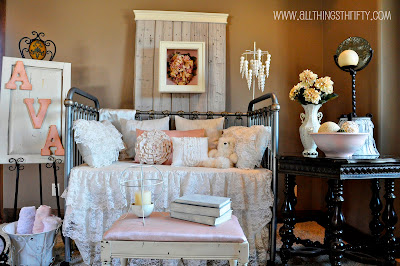
Kallie and I thought it would be really cool to have a white barn door to go in our vintage baby girl’s room, and we debated on what to make it out of. We searched for some old wood for weeks. I even found a barn door at a yard sale, but it was $30.00 and I was too cheap to buy it.
So, I called my friend Sally. She lives in this charming log home that is surrounded by older barns. So, I called to find out of she had any barn wood that she didn’t want. She was so nice. Come to find out Sally doesn’t own the barns around her home, BUT she did have some old tongue and groove wood that she said I could have for FREE! She’s my hero.
She even cut it for me with her chop saw. What a woman.
I’m pretty sure she’s the coolest gal ever.
I loved how old the wood was. Look at the details! It was exactly what we needed to create the vintage look. The tongue and groove wood just slid right into each other to create a perfect fit.
It was PERFECT. Exactly what we needed.
Our vintage baby room was mainly white, but I didn’t just want to paint over this wood full of character. So, I decided to whitewash it. Have you ever wondered how to whitewash? To whitewash, all you need is white paint, a half bucket of water, and a sponge. I poured some white paint into the water to make is a thinned down latex paint, and went to work. I filled the sponge with the watery paint and washed the wood with it.
I laid them on my lawn to dry in between coats. I did about three coats to get the wood the perfect shade of white.
Then my cute hubby (and his little helper, Londyn my two year old daughter) helped secure the slats together.
We put a 2X4 board across the top and bottom of the slats to secure them in place. And since we were creating a vintage look, I actually WANTED the screws to show.
Here it is from the back.
Dan also added some decorative molding onto the top of the slats to finish it off.

I think it adds just what this vintage baby room needed! Total Cost: around $12.00 for the molding and 2X4.
For more details about our vintage baby girl room, go HERE.

your vintage baby girl's room link doesn't work, I would love to check it out though! This is darling, and I focus on baby decorations and accessories in my business, and everything is handmade! This is so inspiring!
Beautiful job! Love this room
can i move in? that is beautiful!
Just beautiful
Gorgeous, and a great tutorial on whitewashing!
Not sure if you know this but white washing came about because folks were trying to stretch their dollars and paint was a luxury most people couldn't afford. When they did buy it, they thinned it out with water to make it last longer. They took their paint brushed and rags and "washed" their fences and homes to make them look nice as well as protect their structures from the weather.
Personally, I like the character the white washes brings out in the wood!
Oh My- I love it, we were just at an old antique shop, looking at old doors,so i could use them in my displays when i take pics,but they cost $65 and up-Coudlnt bare to pay that. I(we)will be making that, totally cute, this is why i love the blogging- i always think im pretty crafty,my husband can build or fix anything i usually ask for, But Did not think of that.. Love It….
Karryann (Gracefully Vintage)
I will be a follower-to see what is next…
I never knew how to white wash something. It's much easier than I imagined. Thanks so much! Your nursery is fabulous btw!
I ADORE this room! Great work 🙂
That room is just gorgeous! When I have kids I will definetely be taking some of these wonderful ideas! so cute
I love that! Seriously! You two gals are so creative! I just might have to copy that. Thanks for the inspiration! Camille